This article provides information for defining, applying, and tracking Approval Workflows.
Approval Workflows provide a method for automating the routing of content through multiple stages of review and approval. Workflow automations can save project managers considerable time and effort in manually tracking the progress of a Review. It also helps ensure the review process is completed as fast as possible, as sequential approval requests are instantly triggered as soon as one stage of approval is completed.
Multiple workflow templates may be defined for your organization. Each workflow designates a specific set of users that may be involved in the Review stages. Different workflows may be developed for different types of content (if different people are involved in the review and creative process). Alternatively, different workflows may also be defined for specific Clients since each Client would typically have different users involved in the process. For this scenario, you may create a general workflow template that can be copied and modified only where necessary to indicate the specific people to include for each Client.
To Define a New Workflow
-
Admins can create and manage Workflows on the Settings > Workflows tab. You can also click on the menu to the right of an existing Workflow to edit, copy, or delete it. Click on New to create a new Workflow.
-
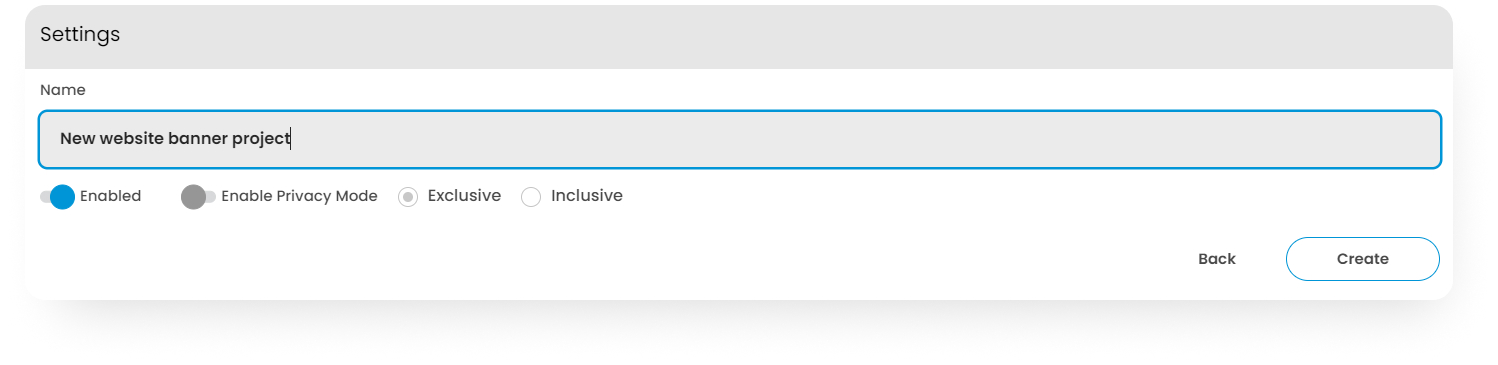
In the menu, provide the name of the new Workflow.
-
The Workflow will stay in draft mode and not be assignable until you activate the Enabled switch. This is important – until you enable a Workflow, it will not appear as an assignable Review option.
-
You can turn on Privacy Options should you wish to use Privacy Mode for Reviews that are associated to the Workflow. For more information on using Privacy Mode: Internal - External Privacy Workflows
-
Click Create.
To Add and Edit Stages in a Workflow
-
Click the + Add Stage button to add a new stage to the last stage of the workflow. You can also click +Insert Stage Here to add a new stage between existing stages. The other option for adding a new stage is to select Duplicate Stage Before or Duplicate Stage After from the action menu of an existing stage.
-
Provide a name to the new stage.
.jpg?cb=e7da74afa8351bee46056bce6f5515f4)
-
If desired, you can set a deadline for the stage by activating the Deadline Active switch. The deadline will be set for the number of business days after the start of the stage and at the time indicated. If 0 days are indicated, then the deadline will be set on the same day that stage begins.
-
Select the users that you want the Review to be shared with during the stage (note that the dropdown list will also include guests). You can also indicate if the user should be an Approver and, if Privacy Mode is active, if the user is to be Internal or External.
.jpg?cb=afcf697441d253b6018975156158eb43)
-
As an option, you can also indicate if a message should be sent to each user at the start of the stage. The messages can be customized for each user by using a Notification Template (see this article).
-
In the user section you have the option to activate link sharing for this stage and to indicate whether any guests that are added through link sharing be considered Internal or External. Note that Guests can not be set as approvers when using workflows. In addition, no notifications are sent to guests at the start of a stage. Guest access would generally only be activated if you want to allow the sharing of a Review during the stage by the other authenticated users.
-
Another optional action to automatically convert the latest file versions in a Review to external so that any previously approved internal versions will now be visible to the external reviewers.
-
One or more goals can now be set that will trigger the end of the Review and the start of the next stage. The trigger options include:
-
All Approve (everyone indicated as an approver has to approve all files)
-
Any Approve (anyone indicated as an approver has to approve all files)
-
Deadline Date Reached (irrespective of the approval status)
-
Revisions Required (with no pending decisions – i.e. If there are multiple files in the Review, the user is required to provide a decision on all the files before this goal is met).
-
No Revisions Required (all the files in the review that required revisions have been updated with a new version).
-
.jpg?cb=caf567322e21ce8d69c50335abb55f44)
-
It’s possible to add multiple goals to a stage and indicate which stage the workflow should branch to upon meeting each specific goal. For example, if revisions are required, the workflow could branch back to a design stage, whereas if the files are approved, the workflow could branch to another approval or production stage.
Be sure to click the Save button to save your work at every stage.
To Start a Review in a Workflow
-
Create a Review using the standard process (see here) but do not share the Review.
-
Once the Review is ready, you can click on the Workflow tab at the top of the edit menu and then click on the Assign Workflow button to select a workflow from the available options.
-
When a workflow is initially assigned to a Review it starts off in a deactivated state so that, if desired, you can make changes to specific stages to adapt the workflow for any particular needs of this Review. Note that any changes you make here will not be reflected in the original workflow. The changes made here will affect the workflow only for the specific review it is assigned to.
-
Once any modifications have been made, you can activate the Enable switch to start the workflow running.
To Track the Progress of a Review Through the Workflow
-
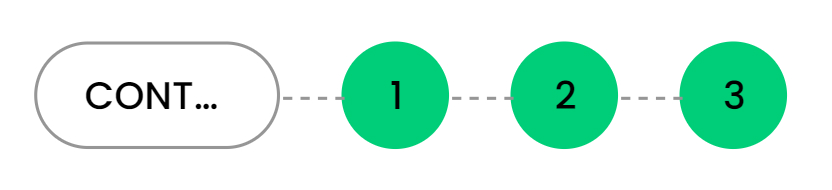
Once a Review has been assigned to a Workflow, a progress bar will be shown on the Review card in the dashboard, indicating what stage the Review is currently in (you can hover over the stage numbers to see the names of the stages). The share list, approval status, and deadline will all indicate the current status of the Review in its current stage.
-
You can filter the Dashboard to show only Reviews in a particular Workflow by selecting the name of the Workflow in the left side column.
-
While a workflow is in progress, it’s always possible for an Admin or manager to continue to modify any aspect of the Review’s settings or share list. It is also possible for an admin/manager to move the Review to any stage of the Workflow or to even reassign a completely new workflow. These actions can be done through the Review action menu on the main dashboard.
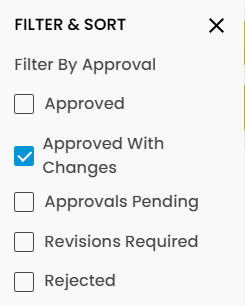
Filtering Reviews by Approval Status
Note that in the Dashboard, Reviews can be filtered and sorted by Approval stage or Status.